How to Change Phone Number On Facebook 2019
By
Arif Rahman
—
May 18, 2019
—
Change Phone Number In Facebook
Including mobile number to your Facebook account provides added functionality like text updates and activity notices. How To Change Phone Number On Facebook: Registering mobile number on Facebook also helps at the time of password recovery and for easier account logins. But all the above only feature properly if you are utilizing a running and working mobile number.

In case you have discarded your number as well as have purchased a new one, you ought to also update the new number on your Facebook account.
If you intend to change your registered mobile number on Facebook, you must adhere to the described actions:
How To Change Phone Number On Facebook
Step 1: On your internet browser, open https://www.facebook.com/
Step 2: On the Facebook's welcome display that opens up, login using your information. This could be your mobile number as well as your password or your email address as well as password
Action 3: On the homepage of your profile, click the drop down arrow to access the settings button. This arrow situated on the notifications tab at the top right corner of the web page.

Tip 4: Click setting: From the drop-down list that appears, click the Settings choice as revealed bellow.
Tip 5: On the General Accounts Settings page that opens, pick Mobile from the categories present in the left pane.

Action 6: On the Mobile Settings page, under Your phones section, click the Add another mobile phone number link. Below you can do scuba diver of procedure to your mobile setting. These include: Add brand-new mobile number, shed your number as well as if you are already included one previously, you may wish to change it.

Though, the purpose of this write-up is to change Facebook phone number on your account. Then, click remove and add new mobile number.
Step 7: On the Please re-enter your password box that opens up, enter your password to validate your actions, click Submit.
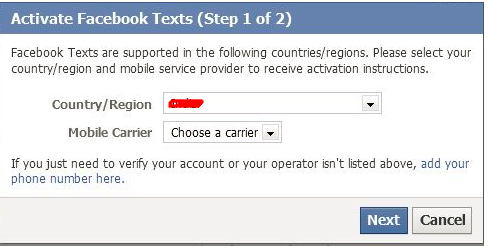
Step 8: On the Activate Facebook Texts window that shows up, choose your country/region and also your mobile carrier from the particular fields. After that click Next to continue.
Step 9: On the brand-new home window that opens up, input the verification code that you will get on your new mobile number. As quickly as you will certainly get in the verification code, your mobile number will be registered with Facebook.

If you do not get the verification code right away, please wait on some while. As soon as you obtain the code, go back to the very same Mobile area under the Settings page of your Facebook account, as well as input the confirmation code to wrap up the registration process on change Facebook telephone number.
If you desire, you can now eliminate (separate) your old mobile number from your Facebook account in case it is not in operation.
In case you have discarded your number as well as have purchased a new one, you ought to also update the new number on your Facebook account.
If you intend to change your registered mobile number on Facebook, you must adhere to the described actions:
How To Change Phone Number On Facebook
Step 1: On your internet browser, open https://www.facebook.com/
Step 2: On the Facebook's welcome display that opens up, login using your information. This could be your mobile number as well as your password or your email address as well as password
Action 3: On the homepage of your profile, click the drop down arrow to access the settings button. This arrow situated on the notifications tab at the top right corner of the web page.
Tip 4: Click setting: From the drop-down list that appears, click the Settings choice as revealed bellow.
Tip 5: On the General Accounts Settings page that opens, pick Mobile from the categories present in the left pane.
Action 6: On the Mobile Settings page, under Your phones section, click the Add another mobile phone number link. Below you can do scuba diver of procedure to your mobile setting. These include: Add brand-new mobile number, shed your number as well as if you are already included one previously, you may wish to change it.
Though, the purpose of this write-up is to change Facebook phone number on your account. Then, click remove and add new mobile number.
Step 7: On the Please re-enter your password box that opens up, enter your password to validate your actions, click Submit.
Step 8: On the Activate Facebook Texts window that shows up, choose your country/region and also your mobile carrier from the particular fields. After that click Next to continue.
Step 9: On the brand-new home window that opens up, input the verification code that you will get on your new mobile number. As quickly as you will certainly get in the verification code, your mobile number will be registered with Facebook.
If you do not get the verification code right away, please wait on some while. As soon as you obtain the code, go back to the very same Mobile area under the Settings page of your Facebook account, as well as input the confirmation code to wrap up the registration process on change Facebook telephone number.
If you desire, you can now eliminate (separate) your old mobile number from your Facebook account in case it is not in operation.