Saving Pictures From Facebook
By
MUFY UJASH
—
Nov 17, 2018
—
Saving Photos On Facebook
Facebook has placed a large emphasis on multimedia in the last few years, and it's where most of us share pictures and video online. The social media is cost-free, basic, and also does not need us to invest any kind of additional time showing to good friends because that's exactly what it's made for. It's estimated that more than 300 million pictures are uploaded each day, making it among the biggest online photo directories on the planet.
Offered this large quantity of pictures on Facebook, it's likely that you've submitted a picture or 2 in the past, particularly if you have actually used the solution for a considerable amount of time or understand individuals that could have included you in their very own pictures. Yet just how do you fetch stated pictures from Facebook if your computer system collisions, or if you make a decision to deactivate your account and relax? Well, we have actually come up with this useful overview of aid you out.

Saving Pictures From Facebook
Saving a single image using Facebook
Prior to we look into more advanced options, it's worth noting that there is an easy method to download your photos one-by-one, or an image from a friend or Facebook group that catches your eye. To do so, click the image in your timeline as well as pick Options in the menu bar that appears when you mouse over the photo. Later, click Download as well as pick a save area for the resulting file. It's a rather straightforward and quick way to download photos.

Certainly, this is not mosting likely to work well for the hundreds or hundreds of pictures that you could have. For more engaged projects, follow these basic means to obtain it done rapidly with a very little amount of job.
Saving multiple photos utilizing Facebook
Facebook makes it a snap to download and install all of your valuable images right from your account settings. Unfortunately, the solution only enables you to download and install a duplicate of all your Facebook data-- photos, posts, close friends, the entire nine backyards - as well as there is presently no option to single out any type of specific sort of content. It's still a terrific method if you're wanting to bypass added software application, internet browser expansions, and so on.
Step 1: Access your Account Settings and also Confirm Identity
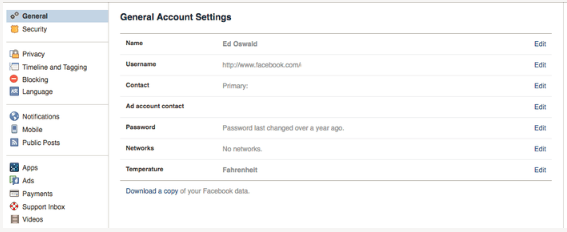
Click the down arrowhead in the upper-right corner of your Facebook homepage - straight to the right of the padlock icon. From there, you'll intend to choose Settings from the list of offered options. This need to take you to the General Account Settings tab in your account settings, which houses the choice you'll require. Click Download a copy of your Facebook data and, on the following web page, click the Start My Archive button.
Action 2: Start the Archive Refine.
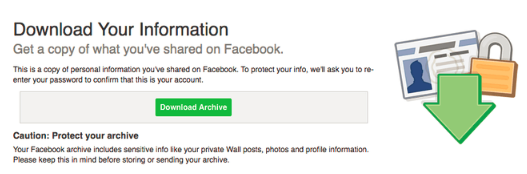
When done, you'll be triggered to enter your password. Enter it as you would usually and click the Submit switch. The resulting pop-up will notify you of just what you're about to download, which includes your conversation history, images, text posts, and a riches of information that's much better detailed in Facebook's aid web pages. As a matter of fact, anything labeled with "Downloaded info" under the Where can I locate it? column on claimed help web page will be consisted of in the archive. As you can think of, this will be a substantial documents.
Action 3: Wait.
Once sent, a message will certainly show up on the download page saying, "We're generating your personal archive. We'll email you when it's ready" Now, simply wait while Facebook assembles your archive. You'll receive an e-mail when your archive prepares, so you do not always should remain on the page while this happens - Facebook will certainly consist of a connect to the page within the e-mail. The process can occupy to a half hour to complete, nevertheless, particularly if you have actually been on Facebook for a long period of time. Stand by.
Tip 4: Download the archive.
You will get an email from Facebook when your individual archive is ready to download. Click the coming with link, or accessibility the download web page once more from the General Account Settings Tab when you're ready to download the file. After that, re-renter your password and also click the green Download Archive switch to download every one of your details as a ZIP data.
Step 5: Look into your images!
Open up the resulting documents-- it should be entitled after your name-- and click on the "index.htm" file. Fortunately, Facebook organizes this in such a way that makes it very easy to navigate utilizing your web internet browser. Click Photos in the left-hand menu, and you'll see a listing of your pictures, each divided by album. To surf your images, just pick an album!
Offered this large quantity of pictures on Facebook, it's likely that you've submitted a picture or 2 in the past, particularly if you have actually used the solution for a considerable amount of time or understand individuals that could have included you in their very own pictures. Yet just how do you fetch stated pictures from Facebook if your computer system collisions, or if you make a decision to deactivate your account and relax? Well, we have actually come up with this useful overview of aid you out.
Saving Pictures From Facebook
Saving a single image using Facebook
Prior to we look into more advanced options, it's worth noting that there is an easy method to download your photos one-by-one, or an image from a friend or Facebook group that catches your eye. To do so, click the image in your timeline as well as pick Options in the menu bar that appears when you mouse over the photo. Later, click Download as well as pick a save area for the resulting file. It's a rather straightforward and quick way to download photos.
Certainly, this is not mosting likely to work well for the hundreds or hundreds of pictures that you could have. For more engaged projects, follow these basic means to obtain it done rapidly with a very little amount of job.
Saving multiple photos utilizing Facebook
Facebook makes it a snap to download and install all of your valuable images right from your account settings. Unfortunately, the solution only enables you to download and install a duplicate of all your Facebook data-- photos, posts, close friends, the entire nine backyards - as well as there is presently no option to single out any type of specific sort of content. It's still a terrific method if you're wanting to bypass added software application, internet browser expansions, and so on.
Step 1: Access your Account Settings and also Confirm Identity
Click the down arrowhead in the upper-right corner of your Facebook homepage - straight to the right of the padlock icon. From there, you'll intend to choose Settings from the list of offered options. This need to take you to the General Account Settings tab in your account settings, which houses the choice you'll require. Click Download a copy of your Facebook data and, on the following web page, click the Start My Archive button.
Action 2: Start the Archive Refine.
When done, you'll be triggered to enter your password. Enter it as you would usually and click the Submit switch. The resulting pop-up will notify you of just what you're about to download, which includes your conversation history, images, text posts, and a riches of information that's much better detailed in Facebook's aid web pages. As a matter of fact, anything labeled with "Downloaded info" under the Where can I locate it? column on claimed help web page will be consisted of in the archive. As you can think of, this will be a substantial documents.
Action 3: Wait.
Once sent, a message will certainly show up on the download page saying, "We're generating your personal archive. We'll email you when it's ready" Now, simply wait while Facebook assembles your archive. You'll receive an e-mail when your archive prepares, so you do not always should remain on the page while this happens - Facebook will certainly consist of a connect to the page within the e-mail. The process can occupy to a half hour to complete, nevertheless, particularly if you have actually been on Facebook for a long period of time. Stand by.
Tip 4: Download the archive.
You will get an email from Facebook when your individual archive is ready to download. Click the coming with link, or accessibility the download web page once more from the General Account Settings Tab when you're ready to download the file. After that, re-renter your password and also click the green Download Archive switch to download every one of your details as a ZIP data.
Step 5: Look into your images!
Open up the resulting documents-- it should be entitled after your name-- and click on the "index.htm" file. Fortunately, Facebook organizes this in such a way that makes it very easy to navigate utilizing your web internet browser. Click Photos in the left-hand menu, and you'll see a listing of your pictures, each divided by album. To surf your images, just pick an album!