How to Save Photos From Facebook
By
MUFY UJASH
—
Nov 4, 2018
—
Saving Photos On Facebook
Facebook has put a huge emphasis on multimedia over the last few years, as well as it's where the majority of us share pictures and video clip online. The social media network is cost-free, simple, and does not require us to spend any kind of additional time showing pals since that's just what it's produced. It's approximated that greater than 300 million images are published each day, making it among the greatest on-line picture directory sites on earth.
Provided this sheer quantity of images on Facebook, it's likely that you have actually submitted a photo or two in the past, particularly if you've used the service for a considerable amount of time or know individuals that may have included you in their very own pictures. However exactly how do you get said pictures from Facebook if your computer system crashes, or if you make a decision to deactivate your account and take a break? Well, we've developed this convenient overview of help you out.

How To Save Photos From Facebook
Downloading a single picture making use of Facebook
Prior to we explore advanced choices, it's worth keeping in mind that there is a simple way to download your pictures one-by-one, or a photo from a friend or Facebook group that captures your eye. To do so, click on the image in your timeline and choose Options in the menu bar that shows up when you computer mouse over the picture. Later, click Download and also choose a save area for the resulting file. It's a pretty simple and quick method to download photos.

Naturally, this is not mosting likely to function well for the hundreds or thousands of pictures that you may have. For more involved projects, follow these basic methods to get it done promptly with a very little quantity of job.
Downloading multiple pictures using Facebook
Facebook makes it a breeze to download and install all your precious images right from your account setups. Regretfully, the solution only enables you to download a copy of all your Facebook data-- images, posts, friends, the entire nine yards - and also there is currently no alternative to distinguish any type of details kind of material. It's still an excellent technique if you're planning to bypass extra software program, browser expansions, and so forth.
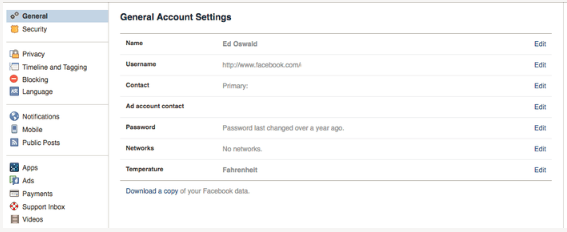
Step 1: Access your Account Settings and Verify Identification
Click the down arrow in the upper-right corner of your Facebook homepage - directly to the right of the padlock icon. From there, you'll intend to pick Settings from the list of readily available choices. This need to take you to the General Account Settings tab in your account settings, which houses the alternative you'll require. Click Download a copy of your Facebook data as well as, on the following web page, click the Start My Archive switch.
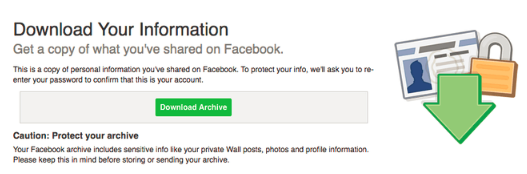
Action 2: Begin the Archive Process.
As soon as done, you'll be triggered to enter your password. Enter it as you would normally and also click the Submit switch. The resulting pop-up will alert you of what you're about to download, which includes your chat background, pictures, message articles, and a wealth of details that's better outlined in Facebook's help web pages. Actually, anything labeled with "Downloaded info" under the Where can I discover it? column on claimed help page will certainly be consisted of in the archive. As you could think of, this will be a huge file.
Action 3: Wait.
As soon as submitted, a message will show up on the download page stating, "We're generating your personal archive. We'll email you when it's ready" Now, simply wait while Facebook constructs your archive. You'll obtain an email when your archive is ready, so you don't necessarily should remain on the web page while this happens - Facebook will consist of a connect to the web page within the e-mail. The process can occupy to a half hour to finish, nevertheless, especially if you've been on Facebook for a long time. Stand by.
Step 4: Download the archive.
You will get an email from Facebook when your personal archive prepares to download. Click the coming with link, or access the download web page once again from the General Account Settings Tab when you're ready to download the file. After that, re-renter your password as well as click the green Download Archive switch to download every one of your info as a ZIP data.
Step 5: Have a look at your pictures!
Open the resulting file-- it should be labelled after your name-- and click on the "index.htm" file. Thankfully, Facebook organizes this in a way that makes it simple to browse utilizing your internet internet browser. Click Photos in the left-hand menu, and also you'll see a list of your images, each separated by album. To search your photos, merely pick an album!
Provided this sheer quantity of images on Facebook, it's likely that you have actually submitted a photo or two in the past, particularly if you've used the service for a considerable amount of time or know individuals that may have included you in their very own pictures. However exactly how do you get said pictures from Facebook if your computer system crashes, or if you make a decision to deactivate your account and take a break? Well, we've developed this convenient overview of help you out.
How To Save Photos From Facebook
Downloading a single picture making use of Facebook
Prior to we explore advanced choices, it's worth keeping in mind that there is a simple way to download your pictures one-by-one, or a photo from a friend or Facebook group that captures your eye. To do so, click on the image in your timeline and choose Options in the menu bar that shows up when you computer mouse over the picture. Later, click Download and also choose a save area for the resulting file. It's a pretty simple and quick method to download photos.
Naturally, this is not mosting likely to function well for the hundreds or thousands of pictures that you may have. For more involved projects, follow these basic methods to get it done promptly with a very little quantity of job.
Downloading multiple pictures using Facebook
Facebook makes it a breeze to download and install all your precious images right from your account setups. Regretfully, the solution only enables you to download a copy of all your Facebook data-- images, posts, friends, the entire nine yards - and also there is currently no alternative to distinguish any type of details kind of material. It's still an excellent technique if you're planning to bypass extra software program, browser expansions, and so forth.
Step 1: Access your Account Settings and Verify Identification
Click the down arrow in the upper-right corner of your Facebook homepage - directly to the right of the padlock icon. From there, you'll intend to pick Settings from the list of readily available choices. This need to take you to the General Account Settings tab in your account settings, which houses the alternative you'll require. Click Download a copy of your Facebook data as well as, on the following web page, click the Start My Archive switch.
Action 2: Begin the Archive Process.
As soon as done, you'll be triggered to enter your password. Enter it as you would normally and also click the Submit switch. The resulting pop-up will alert you of what you're about to download, which includes your chat background, pictures, message articles, and a wealth of details that's better outlined in Facebook's help web pages. Actually, anything labeled with "Downloaded info" under the Where can I discover it? column on claimed help page will certainly be consisted of in the archive. As you could think of, this will be a huge file.
Action 3: Wait.
As soon as submitted, a message will show up on the download page stating, "We're generating your personal archive. We'll email you when it's ready" Now, simply wait while Facebook constructs your archive. You'll obtain an email when your archive is ready, so you don't necessarily should remain on the web page while this happens - Facebook will consist of a connect to the web page within the e-mail. The process can occupy to a half hour to finish, nevertheless, especially if you've been on Facebook for a long time. Stand by.
Step 4: Download the archive.
You will get an email from Facebook when your personal archive prepares to download. Click the coming with link, or access the download web page once again from the General Account Settings Tab when you're ready to download the file. After that, re-renter your password as well as click the green Download Archive switch to download every one of your info as a ZIP data.
Step 5: Have a look at your pictures!
Open the resulting file-- it should be labelled after your name-- and click on the "index.htm" file. Thankfully, Facebook organizes this in a way that makes it simple to browse utilizing your internet internet browser. Click Photos in the left-hand menu, and also you'll see a list of your images, each separated by album. To search your photos, merely pick an album!